Thursday, March 31, 2016

20 Video Project Ideas to Engage Students from Matt Miller


20 video project ideas to engage studentsIn my classroom, video usually equals instant engagement.


Students like to record it — especially because many of them get to use their phones for school purposes.
But they like to watch them even more, and if those videos are produced by their peers, the interest skyrockets.
That power has huge potential to be harnessed for educational gain.
There are plenty of tools to make it happen, too. Windows Movie Maker (Windows) and iMovie (iOS) come bundled with many new computers, and WeVideo – among others — is a great web-based video editing tool whose free version will accommodate most classrooms’ needs. (I created a Tech Tuesday Screencast demonstrating how to use WeVideo.)
Integrating video projects into the classroom can be as simple or complex as you want. Just grab a phone, digital camera or tablet and your students are on their way.
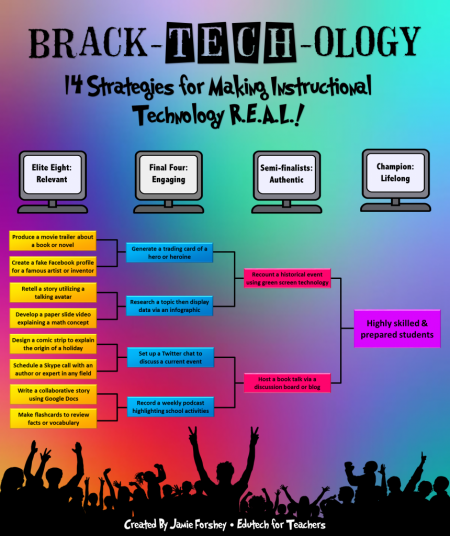
Here are some video project ideas, divided into ideas for any classroom and ideas for specific subject areas:

10 ideas for (almost) any classroom:

1. Create a personal narrative — They can be about students themselves or a character or historical person. Record video clips from many different facets of the subject’s life. Add a voiceover to tell the story and music to set the mood.
2. Tell a story — We’re naturally intrigued by stories. They draw us in and take us to a place and time where we never were. If students use concepts from class and connect them to stories, the result could have a huge impact.
3. Create a whiteboard animation — Set up something with a camera so it won’t move (on a tripod or otherwise). Aim it at a whiteboard or chalkboard. Record and start drawing. Use video editing tools to speed it up to four times its normal speed and add a voiceover (and music?). Here’sa great blog post with the basics on how to create these videos. Below is a whiteboard animation I created to illustrate a conference session I presented (my cropping was not the best!).
4. Record a screencast demonstration — This one benefits teachers and students. Free screencasting sites like Screencast-o-Matic and Screenr turn student computers into simple video creation tools. Students can show a slide presentation with audio descriptions or demonstrate how to do something on their computers. Teachers can easily flip instruction in this way.
5. Give a video message with a speaking avatar — Speaking avatars aren’t anything students record with cameras, but they are technically video and they can be created quickly and easily. Free sites like Voki allow users to create  “talking heads” with custom messages. You can create avatars of some historical characters and speak for them. Students can create them as responses to something learned. Teachers have left substitute teacher lesson plans with Vokis, too.
Here’s one of the introduction to this blog post:
6. Make a tour of a significant location — If students visit a place — on a field trip, on vacation or any time — they can share their learning experience with others by recording video of it and narrating as they go. (If they’re at a museum or other such place, asking permission first is probably a good idea!) If they can’t visit it, creating a video slide show with Animoto or in a screencast would work, too. Take it to the next level by screencasting a trip through a city or important landmarks in Google Earth!
7. Create Vines of vocabulary terms — Vine is the social media site that allows users to create six-second looping video clips and share them. Students can use iOS, Android and Windows devices to create Vines, and they can be downloaded if Vine is not allowed in your school district. Students could show a vocabulary term (on paper, etc.) and then a visual representation of the term. Post them on a class Weebly site and vocabulary learning is redefined!
8. Create GIF examples of classroom content — GIFs are the moving image files. They’re kind of like silent video that’s treated like a picture file. By using a free GIF maker (some good apps for GIFs here), students can create videos of anything class related and place it on a class website simply.
9. Highlight a cause — When students find about problems in the world and decide to act, the result is more than learning — it’s change for the better. Students can use their video skills to encourage others to make change as well and contribute to something bigger than themselves.
10. Dream — Taking classroom learning and putting a “What if?” spin on it is higher-level thinking. Let students speculate what would happen if something in history happened differently or a character in a story made a different decision. Video is a great medium to play those ideas out.

10 ideas for specific subject areas:

11. Recreate a historic speech or moment in history for a social studies class.
12. Display the work and results of a science lab project from beginning to end, from hypothesis to conclusion. Add images of lab data in the project to show specifics of the results.
13. Write and record poetry or short stories that illustrate literary elements learned in an English class. Include Creative Commons or public domain music that matches the mood of the written work.
14. Bring story problems to life or record a whiteboard explanation of a math problem. Use subtitles to further explain concepts in the problem.
15. Create a conversation, explanation or skit in another language for a foreign language class.
16. Show off skills learned in a physical education lesson or impart wisdom for a healthy lifestyle for a health class.
17. Give cooking demonstrations or child development presentations for family and consumer science classes.
18. Record video presentations to take agriculture classes outside the school’s walls, giving demonstrations of live animals, crops or anything ag-related on a family farm.
19. Display the great service projects or school spirit events that extra-curricular activities are engaging in.
20. Send parent and student reminders from the guidance office and make connections from theprincipal’s office in regular video messages.

Wednesday, March 30, 2016

Take the March Madness Technology Challenge

Edutech for Teachers:

Marc24


Are you ready for some March Madness—edtech style? Then be sure to tune in to the Kids Discover blog to check out my guest post about how you can make “IT” (Instructional Technology) R.E.A.L. for your students!

Get your game on here!
Brack-tech-ology Infographic

7 More Tricks to Learn During Spring Break!

From Alice Keeler at Teacher Tech:
7 more tricks
First make sure you check out Shake Up Learnings 7 tips. The awesome Kasey Bell gave me permission to compliment her list with some follow-up tips.

1. Google Forms

Insert hint text

google forms hint text
when creating a question in Google Forms I try to keep the question as short as possible. The question becomes the column header in the spreadsheet. Hint text clarifies the question but does not show up on the spreadsheet. To enable the hint text line, click on the more options icon (3 dots) in the bottom right. Click on “Hint text” to enable this option. Type your hint text below the question line.

2. Google Docs

Insert a comment

Insert a comment
Google Docs allows you to insert comments, like post-it notes, on the side of the document. Highlight what you want to make a comment on and a comment icon shows up on the very edge of the document. Click on this to insert a comment. TIP: While helpful, you can give students feedback comments faster by mastering the keyboard shortcut Control Alt M to insert and Control Enter to save the comment.

3. Google Sheets

Format within a cell

google sheets edit text
Double click on a cell within Google Sheets spreadsheet to edit the contents. Highlight individual words or phrases and change the formatting. Create one word out of the sentence to be bold.

4. Google Slides

Edit the slide master

Google Slides edit slide master
Change the default layouts in Google Slides. Create graphic organizers and custom templates in the Slide master. When students add new slides, the layouts contain the graphic organizer. Locate the Slide master under the “View” menu.

5. Google Drawing

Make straight lines

Straight Lines
Hold down the shift key when drawing lines. The lines will be vertical or horizontal.

6. Google Chrome

Close tabs to the right

Close tabs to the right in Chrome
Right click on a Chrome tab to reveal the option to “Close Tabs to the Right.” As you open several student work documents, Chrome can become littered with tabs. Right click on the tab you want to keep and choose to close all the rest of the tabs.

7. Google Classroom

Link to an assignment

Google Classroom link to instructions
Open an assignment in Google Classroom and click on the “Instructions” tab. The URL of that page can be copied and shared with students to direct them to that exact assignment. This can be useful when referring back to a previous assignment. Link in the new assignment back to the old assignment. Use this link when sending reminder emails to students who are tardy submitting.

Tuesday, March 29, 2016

3 Tools Students Can Use to Add Annotations to Videos

From Richard Byrne at Free Technology for Teachers

When we talk about flipped lessons it often involves a lot of heavy lifting on a teacher's part. From finding a video to adding questions to the video, it is a time-consuming process and in the end we're still not always sure if the students actually watched the video or they just guessed at the answers to the questions. One way to flip the standard flipped classroom model is to have students find and annotate videos that they then submit to you. The following three tools can be used by students for that purpose.

Using VideoANT anyone can add annotations to any publicly accessible YouTube video. To do this copy the URL of a video and paste it into the VideoANT annotation tool. Then as the video plays click the "add annotation" button when you want to add an annotation. To have others annotate the video with you, send them the VideoANT link. You are the only person that has to have a VideoANT account. Your collaborators do not need to have a VideoANT account to participate in the annotation process with you. Nathan Hall wrote a complete run-down of all of the features of VideoANT. He also posted a how-to video. I recommend reading his post and watching his video here.

Vialogues is a free service that allows you to build online discussions around videos hosted online and videos that you have saved on your computer. Registered users can upload videos to Vialogues or use YouTube videos as the centerpieces of their conversations. In the video embedded below I provide a short overview of how Vialogues works.


MoocNote is a free tool for adding timestamped comments, questions, and links to videos. To do this on MoocNote you simply paste a link to a YouTube video into the MoocNote editor. Once the video is imported you can start to add your comments, questions, and links. The link features is particularly useful for providing students with additional resources for learning about the topics covered in your shared videos. MoocNote allows you to organize playlists (MoocNote calls them courses) of videos according to topics that you identify. MoocNote could be a good tool for high school teachers who want to organize playlists of videos for their students and add some clarifying information to those videos. You could also have students use MoocNote to annotate videos to demonstrate an understanding of the topic at hand.

Using Google Calendar Extension

#TechTipTuesday - Google Calendar Extension


Ever get lost in your work and miss a meeting?

Ever been surfing the web and remember that you needed to add a meeting to your calendar?

Ever get exhausted with having to constantly check your phone for what's next on your agenda while toiling away on your computer?

Well look no further than the Google Calendar Chrome Extension


Monday, March 28, 2016

7 Google Tricks to Try During Spring Break

From Shake Up Learning:
Who’s ready for Spring Break? I know I am! Spring Break is a great time to relax, vacation, spend time with loved ones and recharge. It is also a great time to sharpen your saw! So I have put together this quick list of Google tricks for you to try during your break. There have been some great updates to Google Apps over the last few months, and spring break is the perfect time to play and learn some new Google tricks! I kept this list short, so it doesn’t require much of your precious vacay. Below are seven new features from Google for you to test drive during your break.

The New Google Forms

Google has officially made the new Forms the default version, and they have added a lot of the features that we have been waiting for, including Add-Ons. The new Google Forms has a purple icon instead of green. You still have the option to run back to the old version. For all the details from Google, click here. Here are some new features to check out in the new Google Forms:

1. Google Forms Templates
Go to forms.google.com and see all of the helpful templates that are there and ready to use. Be sure to click on “More,” near the top right to see ALL of the templates.

Screen Shot 2016-03-03 at 8.54.35 AM

2. Google Forms Notifications

Get Notified for every form response. The Default is set to off, but you can enable it from the Forms settings menu (3 dots on the Responses tab).

Screen Shot 2016-03-03 at 8.04.39 PM

3. View Individual Responses in the Google Forms Editor

You will now be able to view each individual response in the same format of the form. THIS IS GREAT FOR TEACHERS! A lot of teachers have been asking for this feature and using Add-Ons in Sheets to create their own. Now you can scroll through all of your students responses, page by page!

Screen Shot 2016-03-03 at 9.08.11 AM

4. Track Google Forms Responses

You will also be able to see a list of who you have sent your form to, and how many haven’t responded yet.


credit: http://googleappsupdates.blogspot.com/

5. Google Forms Add-Ons

If you are not familiar with Add-Ons, Add-Ons give you some additional functionality inside Google Forms. For instance, try the Form Limiter Add-On to shut off a Google Form after a certain number of responses, at a specific time, or when your spreadsheet contains a certain value. To see and install Add-Ons, go to the three dots in the top-right (3 dots is always a menu or more actions), and select Add-Ons. From here, you can view the gallery of Add-ons. The puzzle piece at the top of the page allows you to choose and run the add-ons that you have already installed.

2016-03-03_20-13-39

Google Docs Updates

There have also been some fun updates to Google Docs as well. Try out the two new features below.

6. New Templates in Google Docs

Google recently added, even more, templates to the Google Docs gallery of templates. These are fantastic! AND they were created by some pretty big names and businesses. To see the new templates, go to docs.google.com, and select “more” near the top-right. There are great templates for teachers and students like lesson plan templates, essay and book reports, and even some nice newsletter templates.


credit: http://googleappsupdates.blogspot.com/

7. Voice Typing in Google Docs

Voice typing in Google Docs debuted several months ago, but they have added additional functionality to it. Now, you can issue formatting commands! Voice typing is a great way to help new and emerging writers, struggling writers, and language learners. But it also great for everyone else! Most of us can talk a lot faster than we can type, so we can dictate just about anything we like in Docs. I will definitely be using this myself to save time!


Friday, March 25, 2016

How to Transform the Social Studies Classroom in 140 Characters or Less

How to Transform the Social Studies Classroom in 140 Characters or Less: #mcss16

Twitter is a powerful tool. But what can it look like in a social studies classroom? Missouri teacher Jordan McGaughey spent a hour this morning sharing his ideas of using Twitter as a teaching, learning, and professional development tool. 
Jordan started by sharing what the use of Twitter can look like at different levels of Bloom’s. I really like this image – great way to jumpstart personal and professional conversations:
blooms and twitter
So what are the ideas?

Thursday, March 24, 2016

7 Blogging Platforms for Teachers Compared and Ranked

From Richard Byrne at Free Technology for Teachers:

 This afternoon I updated my chart of seven blogging tools for teachers. The chart is available as aGoogle Doc or as a PDF embedded below. Unlike some of my other charts, at the bottom of this one I included my ranking of the tools. That ranking is also written below the chart embedded into this post.

 
1. WordPress.org - If you have the technical accumen or the time to learn it (it’s not that hard), self-hosting a blog that runs on WordPress software will give you the ultimate in control and flexibility. You will be able to create and manage student accounts, have a nearly infinite variety of customizations, and you’ll be able to move your blog from server to server whenever you want to. That said, you will have to pay for hosting (or convince your school to give you server space) and you will be responsible for maintaining security updates and backing-up your blog regularly. 

2. Blogger - It’s free and easy to set-up. It can be integrated into your Google Apps for Education account which means that you and your students can use the same usernames and passwords that they use in all other Google tools. You can make your blog private (up to 100 members invited by email). The drawback to it is that a lot of school filters flag it as “social media” and block it on those grounds. 

3. Weebly for Education - It’s free to have up to 40 students in your account. You can manage your students’ accounts. You can have students contribute to a group blog and or let them manage their own individual blogs. 

4. Edublogs or Kidblog - Both services allow you to manage your students’ accounts. Both require you to pay for a subscription in order to get the features that you really want. Those features include embedding videos and other media from third party sites. Both services are powered by WordPress. I give a slight edge to Edublog because they have proven, outstanding customer support. Edublogs also offers mobile apps while Kidblog does not. 

5. SeeSaw.me - SeeSaw was originally launched as a digital portfolio tool. The addition of a blogging component was made in January 2016. The blogging component of SeeSaw allows you to import and display your students’ digital artifacts publicly or privately. There is not much you can do with SeeSaw in terms of customization of layout and color scheme. SeeSaw is free for teachers and students to use, but charges parents for access to see their students’ digital portfolios. 

6. WordPress.com - It’s easy to use and is free, but with some serious limitations at the free level. The free version displays advertising on your blog which you cannot control. The free version also doesn’t allow embedding content from many third-party sites.

Wednesday, March 23, 2016

13 Google Forms Tutorial Videos

From Richard Byrne at Free Technology for Teachers:

Last week the new version of Google Forms became the default version in many Google Accounts. But, as many people have pointed out to me, not all Google Accounts have made the transition. This is particularly true in Google Apps for Education accounts. Therefore, I put together a new playlist of Google Forms tutorials that includes videos demonstrating features of the new version of the Google Forms and the older version of Google Forms. By the way, for the time being, you can revert to the older version at any time.

In my new Google Forms tutorials playlist you will find videos demonstrating how to customize both the old and new versions of Google Forms, how to install Add-ons in both versions, and you will find tutorials on some of my favorite Google Forms Add-ons. The new playlist is embedded below.