Friday, March 4, 2016

3 Reasons Students Should Own Your Classroom's Twitter and Instagram Accounts

By Kayla Delzer (Columnist) 

It is quickly becoming a non-negotiable for all classrooms to leverage social media in order to communicate with families and other classrooms—thus engaging others in the daily lives of students. While simply posting “fun” photos is a start, this novelty wears off quickly, and as a result, we must think more critically about how we communicate via social media.
As a second grade teacher who facilitates a student-centered classroom, I now believe our use of social media is an opportunity for students to partake in the type of learning in which they can thrive and shout their story to the world.

1. Genuine Digital Citizenship Opportunities

In fall 2012, I liked the idea of Twitter, but the thought of social media infiltrating my classroom was still a bit scary. So I developed an analog Twitter bulletin board and had each student write out their tweets on sentence strips daily.
A month later, I realized the value of students sharing work with more than just those in our classroom. So, I jumped right in and set up a Twitter account under my name, with the intention of letting the students run it. However, rather than immediately giving them complete control, and possibly negatively affecting all of our digital footprints, we prepared ourselves through digital citizenship bootcamp. Throughout these lessons, we used gradual release of responsibility (the same technique used in my classroom in other subject areas) to systematically turn the “social media reins” over to the students.
At first, while this whole process was uncomfortable for me (to say the least), I understood I was doing my students a disservice by not actually helping them to develop their digital footprints in a genuine environment. In the end, my comfort level was less important than their experiences on social media.
What we do in my classroom: This fall, students in our classroom completed digital citizenship bootcamp. My students had to pass seven different digital citizenship rules before I was going to give them access to our accounts as “Tweeter of the Day” and “Instagrammer of the Day”. To take this a step further, I also had parents come in one night to complete the boot camp, as well. That’s right—a parent social media bootcamp, where my students were the teachers, helped their parents get set up with accounts, and taught them about everything from retweets to our district hashtags.

2. Publishing for the World (and the Classroom Across the Hall) is Powerful

When we allow students to write and share their work with the world, suddenly their work becomes more valuable. Students will always do their worst writing when they know the only person who will ultimately view it is their teacher. How many assignments in classrooms are completed solely for teacher as a requirement of the curriculum?
Additionally, while sharing our stories with the world is invaluable, there’s something to be said with simply using social media to share your story across the hallway. Canadian educator George Couros challenged me to use our account in a way that could connect our classroom with not only the world, but the other classrooms right in our school. This is where our school hashtag#LegacyK5 was born.
What we do in my classroom: Students in my classroom now post to that hashtag knowing our principal, previous teachers, future teachers, and other staff members are going to see their work. When my students tweet, blog, or post on our Instagram page, they are sharing their work with thousands of followers. There is a positive and almost competitive pressure in knowing that their work will be viewed by their parents, other classrooms around the world, friends, our principal, and experts—and best of all, they step up their game because they have an authentic audience to share their work with.

3. Establishing Your Classroom Brand

According to educators Joe Sanfelippo and Tony Sinanis, branding can be defined as “the marking practice of creating a name, symbol or design that identifies and differentiates a product from other products.” Within the past few years, this idea of branding our schools/classrooms has become extremely valuable, as it promotes transparency by painting an accurate, live picture of what is taking place. Yet, in reality, the majority of the time the educators are the ones telling these stories. While this certainly has its place, ultimately what matters most is how students feel about their experiences. Social media has allowed my students to share our classroom happenings through their eyes. It has allowed my students the opportunity to both establish and share the culture of our classroom and our school, and ultimately create our “brand”.
What we do in my classroom: By literally handing over classroom devices that are logged into our accounts, I am giving my students control to cultivate our brand. We have a rule in our classroom to only share pictures and the work of students that are engaged or making smart choices. Additionally, my students start each day with an introductory post (and usually a selfie or picture with me), and sign every post so our followers know who is writing that day. Day by day and month by month, they are sharing work that they deem important from inside our four walls.

The Sky’s the Limit

The opportunities my students have had because of Twitter far outweigh the risks associated with setting up a student lead account. In November, my students had the life-changing opportunity to do a Google Hangout with Brad Waid while he was doing professional development in Hong Kong, China. Following him on Twitter two years ago lead to this beautiful relationship that allows us to follow his journey all over the globe. He has brought new culture, knowledge, and expertise to our classroom. Brad has been an amazing expert who has connected with my classroom over and over again.
In January, my students were invited to do a Google Hangout to chat about digital citizenship with the #DigCitSummitUK. My students became global speakers overnight because of their outstanding work on our social media accounts. To say this is an honor would be an understatement—such a proud teacher moment!
Social media is happening—with or without you. The lessons my students learn by taking ownership of social media ends up enhancing all of their work, both in and out of school. And let’s be honest… wouldn’t you prefer to have your students write the story of your classroom, rather than someone else?

Thursday, March 3, 2016

10 Tips to use Google Classroom effectively and efficiently

From Matt Miller at Ditch That Textbook:
Google Classroom can be even more powerful with a few tips and strategies to make it efficient and effective.
Google Classroom streamlines the management of student work — announcing, assigning, collecting, grading, giving feedback and returning. It has certainly saved many teachers hours of work.
Without a solid workflow and some strategy, grading digital work can be cumbersome. Google Classroom does make working with student work more efficient — but only if you understand how Classroom works and how to use it to your advantage.
Sometimes, a few quick tips can make all the difference.
Here are 10 tips to help you use Google Classroom more effectively and efficiently:
1. Use move to top to bring important older material back to students’ attention. This simple act bumps an assignment, announcement or question to the top of the class stream. Use this if students haven’t turned an assignment in OR if you want to remind them of an upcoming deadline.
email everyone2. Email everyone in a class in the “Students” tab. Once you click the “Students” tab, click the checkbox above all of your students to highlight everyone. Click “Actions” and “Email.” This is great for calling special attention to something you want to communicate to students OR for longer-form communication.
3. Use the right kind of comment. There are several kinds of comments you can leave students in Classroom. Knowing how each one works can make you more efficient and effective.
  • Adding class comments: Do this by adding a comment in your class stream on the “outside” of an assignment or announcement. This will make the comment visible to the entire class (important if it’s an answer to a question anyone might have).
  • Adding private comments: Do this by viewing student results and clicking on an individual student. On the right, where you can see student submissions, the comment bar at the bottom adds a comment that only the student can see (important if it has sensitive grade or feedback information).
  • Adding comments in a doc/slide/sheet/drawing: Do this by clicking on the student’s file that he/she submitted to you. Click the black speech bubble icon after highlighting something you’d like to comment on. This adds a a very pointed comment on specific items in student work (important to be very exact in feedback).
4. Use announcements to share “right now” links. Announcements put content in your classroom stream without creating an assignment students must turn in. Use them to give students important links, docs/files and videos they’ll need right now. (If it’s a resource they’ll need often, add that resource to the “About” tab instead.)
keyboard commands5. Use the keyboard instead of the mouse.Keyboard commands beat moving and clicking the mouse every time. The best one in Google Classroom: When entering grades, type the grade for a particular student’s assignment, then push the down key to get to the next student. Cycle through students with keystrokes instead of mouse clicks to save lots of time.
6. Reuse posts. Don’t recreate assignments, announcements or questions that are similar to those you’ve already created. Click the “+” button in the bottom right and select “reuse post.” Choose an assignment, announcement or question you’ve created before. You can modify and update it before you repost it.
  • When you reuse a post, you can even choose to create new copies of all the attachments you used before.
7. Grade everything in one place. Click the three lines button in the top left of Classroom and select “Work” at the top. Here, you’ll find all of the assignments for all of your classes in one place. Work your way down the list and get on top of everything in one spot.
8. Get email from Classroom the way you want. Do you spend too much time deleting email notifications from Classroom and wish you could turn them off? Click the three lines button in the top left of Classroom and choose “Settings” at the bottom. There’s a checkbox where you can turn off emial notifications. (Or if you have it turned off and wish you’d get emails, that’s where you turn them on!)
9. Get ideas from others. Educators that are already using Google Classroom hang out in lots of online communities where you can read their posts and ask questions. Here are some suggestions:
10. Get the features you really want in Classroom. Do you have a suggestion for a new Google Classroom feature? Is there something you can do but wish you could do it easier? This type of feedback is what the Google Classroom team craves from teachers. Click the “?” button in the bottom left of the screen and choose “Send Feedback.” According to the Google Classroom team member that talked to my Google Teacher Academy group in December 2014, someone from their team reads every single feedback item sent that way. It’s how they’ve made many of the important feature changes to Google Classroom. And the more popular a feature request, the more likely it’ll be implemented. So send feedback and send it often!
Click for full-sized infographic!

Blogger

From Kelly Fitzgerald the EdTech Nut:
Blogger is a blog publishing tool that comes free with your Google account. You can create private or multi-user blogs.
  • required age of 13+ (private Google account)
  • permitted for 12 years and younger with a Google Apps for Education district account (with parent consent)
Guides


Integration Ideas

  • Students can blog as a way of journaling.
  • Have students demonstrate understanding through blogging.
  • Create a class blog and have students as guest bloggers.

Additional Resources

Wednesday, March 2, 2016

The NEW Google Forms: 9 classroom uses

From Matt Miller at Ditch That Textbook
The new Google Forms makes classroom activities more efficient and more attractive. Here are 9 ways you can use Google Forms.
For years, educators have been using Google Forms to gather data, assess learning and create fun techy learning experiences.
Recently, Google Forms got a facelift, and even more recently, it added some new features. These features make some new things possible in the classroom, and they make some things easier — and prettier — than before.
Here are some of the changes and what you can do with them in class. If you’ve used Google Forms before, please keep your favorite uses of Forms in mind and add them as a comment at the end of the post!
The new Google Forms makes viewing submissions easier than ever.
The new Google Forms makes viewing submissions easier than ever. (Click for full-size image.)
1. Hustle through student responses to quizzes, assignments and surveys. Responses in Google Forms are much easier to review now. Before, you could view them in a spreadsheet or see a brief summary of them. Now they’re all gathered right in the form editor under the “responses” tab. You can now view a summary of answers (all in one place … nice!) OR click through each individual response.
You can still view results in spreadsheet view. However, as I learned on Twitter from Google guruAlice Keeler, Forms won’t automatically create a spreadsheet for you like it did. You’ll have to click the little green spreadsheet icon to create one now.
2. Get an email when students submit forms. Before, to see whether there were new submissions to a form, you had to go into the form (or the spreadsheet of results) and check. Now, you can opt to have Forms email you with new submissions.
This is GREAT for infrequently-used forms, and it’s GREAT to turn on after most of your student submissions have come in. I would NOT turn it on right before giving a quiz or test in Forms. Your inbox will be flooded!
CLASSROOM USE IDEA: Create a “late work submission” form. Since Google Classroom (and other assignment collection options) won’t notify you when late work comes in, a form for that (with email notifications on) would notify you! It’s great for absent students, too.
3. Use add-ons and scripts. This was possible with the old Google Forms, but it was just added with new Google Forms. Add-ons and scripts let you add new functions to your Google Forms for your specific needs. They’re available by clicking the three dots in the top right and clicking “Get add-ons …” or “Script editor …”.
Unless you write code or have some to copy into a form, you probably won’t use the script editor.
ANYONE can use add-ons, though, and there are a few that are really useful in education. I’ll show you one here and one later.
A graph added with the g(Math) add-on.
CLASSROOM USE IDEA: Add math equations to Google Forms with the g(Math) add-on.
  • Click the three dots in the top right and choose, “Get add-ons …”.
  • Find the g(Math) add-on by searching or clicking on its icon.
  • Click the “free” button and install it.
  • Click the puzzle piece icon in the top right and choose “g(Math) for Forms”.
  • Choose which type of entry you want. (At first, if you’re not sure, experiment. If you don’t like what you create, you can always delete it!)
  • Add all the details you need. It will add an image to your question!
4. Make sharp-looking forms with templates and themes. If you’re not exactly sure how you want to make a form, there might be one already created for you. Forms has a library of templates you can choose from as soon as you load it up.
PRO TIP: Type “forms.google.com” in your browser to get to forms quickly. (In the past, you had to go to Drive and click “New” and “Google Forms.”)
Forms offers several templates that do a lot of the work for you.
Forms offers several templates that do a lot of the work for you. (Click to see full-size.)
Some of the templates available:
  • Contact information (users submit their name, address, email, etc.)
  • T-shirt sign up (users give their name, t-shirt size, etc.)
  • Exit ticket (students say what they learned, whether they were prepared, and what would have made the lesson more effective)
  • Assessment (students fill in their name/email and answer quiz questions that you add)
  • Worksheet (students fill in their name/email and answer questions that you add)
  • Course evaluation (students fill in class name and instructor and rate the course in various areas … this one is a good example of how a multiple choice grid works!)
Once you choose a template, you can customize it however you’d like (i.e. add text, images, videos, different kinds of questions, etc.).
Customize your forms by clicking the paint palette in the top right. Choose a color for color scheme or click the photo icon in the bottom right to choose a theme. Themes provide colors and images for forms. You can also upload your own photo to create a theme.
OTHER USES OF FORMS: In a recent reader survey, many people said they wanted to better understand Forms and how it could be used in the classroom. The following ideas were possible in the old Google Forms and are still available in new Google Forms.
5. Create and grade a quiz or test with Flubaroo. Host your quizzes, tests and other assessments digitally with Google Forms. Then, with responses in a spreadsheet, autograde the closed-ended questions (multiple choice, true false, matching) with Flubaroo, an add-on for educators using Google Forms.
  • Create your quiz in a Google Form (from scratch or using one of the templates). If you want to email results to students later, make sure you make a short-answer question called “Email”.
  • Click the eye icon in the top right to view the assessment. Fill it in with all the correct answers and use the words “ANSWER KEY” as the name. Submit it with the button at the bottom.
  • Deliver your quiz to your students:
    • Use the “send” button to get a link to the assessment that you can give students
    • Use the “send” button to email a link to students
    • Add the form to an assignment in Google Classroom
  • When students have taken the assessment, click the “responses” tab and click the green spreadsheet button to see responses.
  • Go to that spreadsheet and click “Add-ons > Get add-ons …”. Search for Flubaroo and add it. (If you already have Flubaroo installed, you won’t need this step.
  • Go to “Add-ons > Flubaroo > Enable Flubaroo for this sheet”.
  • Go to “Add-ons > Flubaroo > Grade assignment”.
  • Use the drop-down menus to tell Flubaroo what to do with each question. Click “Continue.”
  • Choose the answer key you created earlier. (This will be easy if you made the name “ANSWER KEY”!)
  • Flubaroo will create a grading report for you with student scores and more.
Get more information about Flubaroo and its advanced features at the Flubaroo website.
6. Create a place for you to store quick grades. When students completed simple assignments for me, sometimes I would walk around the room, quickly grade their assignments on the students’ desks and write a grade on them. Instead of collecting those assignments, I wanted a place where I could store those grades to transfer to my gradebook later.
I created a Google Form with all of my students’ names on them. As I walked around the room, I had the form loaded on my iPad. I put each student’s scores into that form. Later, I pulled up the responses and transferred them to the grade book.
7. Create a digital sign-out sheet. Need an easy way to track students as they leave and return to your class? Create a Google Form where they log their name and their destination, as well as whether they’re leaving or returning. In the spreadsheet view, it will time stamp their submission, so they won’t need to write the time. (That way, the return time can’t be fudged to make it look like they weren’t gone as long as they were!)
8. Create a flipped classroom assessment. The flipped classroom comes in many different shapes and sizes, but many teachers have students watch a video and then answer some comprehension questions afterward. This is easily done in Google Forms.
  • Create a form. Add a YouTube video (click the icon to the right of the form with the triangle “play” button).
    • Note: You can also add a link to a website, an image, etc. … whatever content you want to deliver to students.
  • Add questions afterward to gauge their understanding.
  • Deliver the form to students:
    • Use the “send” button to get a link to the assessment that you can give students
    • Use the “send” button to email a link to students
    • Add the form to an assignment in Google Classroom
9. Make a Choose Your Own Adventure activity. By using branching (the “go to section based on answer” choice in the three-dots menu in a multiple-choice question), you can create fun Choose Your Own Adventure Story-type activities. Create them for your students or let students create their own!
Here’s a screencast video tutorial I created a while ago to show you how it works. The basics are still there, although the video shows how to do it with the old Google Forms.

Tuesday, March 1, 2016

Nominate a colleague, Spread the Love!

Take the opportunity to recognize a colleague that is trying something new with technology!

YouTube Playlists: Find those videos with ease

#TechTipTuesday - YouTube Playlists: Find those videos with ease


Ever found that perfect YouTube video at home and then couldn't find it the next day at school, well that YouTube account isn't just for posting videos it can also keep track of all those great video resources you want to use in your learning spaces!


YouTube Playlists


Simple start: Login to YouTube using your Google account (setup your YouTube account using your Google account if you've not made one yet)

Now then, find that perfect video

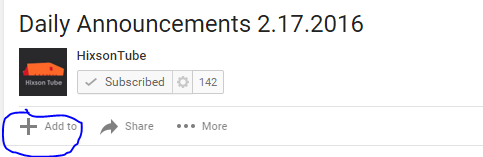
Notice the big plus sign and words 
"Add to"
below the video, give it a click
And this menu will pop up
Choose from any one of the pre made lists or choose "Create new playlist"
For this post I will create a new one and give it the title below
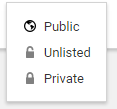
Then choose whether you want the playlist to be:
Public: Anyone can seee this playlist
Unlisted: Anyone with the link to this playlist can see the playlist
Private: Only you (so long as you are logged in) can see the playlist

Once you choose, click create.
Now it's time to navigate back to your channel, you can click the YouTube Icon anywhere to take you back to main, then click on "My Channel"

Once you've landed back at your channel, click on playlists


VoilĂ , you've created your very own playlists. Create as many as you like, add the same video to multiple playlists and find them with ease stored in the Playlists section of your YouTube Channel

Happy list making, and as always 

Stay tuned, and 
Stay connected.

4 Update to Google Form You're Going to Love

Earlier this week, Google announced a list of new features for Google Forms. Boasting templates that come pre-populated with suggested questions based on your use case and the ability to see who has completed your form and who hasn’t, these new features not only make it easier to create forms, but also provide insight into how your forms are completed.

1) Start From Scratch No Longer


party invite
One of the biggest time saving features in this recent rollout are form templates. There are 20 different templates to choose from that are categorized by education, personal, and work. Templates cut out a lot the work you used to spend building and customizing your Google Form. Included in the Template Library are party invites, customer feedback surveys, and even course evaluations for schools. The templates come loaded with photos, questions, and other data specific to your use case. For example, the party invite template includes questions you might sometimes forget to add, such as dietary restrictions or what side dish each guest is bringing.

2) Go Shopping For Add-Ons for Forms

addons
Add-ons and App Scripts are now available in the new Forms editor. Add-ons are great third party tools you can download to help gather more interesting data or integrate with other applications such as Smartsheet. From the top right corner of your Google Form, select the “…” button in the top right corner and then click “Get add-ons.” This menu pictured above will appear where you can peruse and download many different add-ons.

3) Track Survey Progress and Analyze the Results

summaryofresponses
How useful would it be to be able to see who’s taken your survey and who hasn’t? Now you can track a participant’s progress on a form. There’s even an option to send a reminder to fill out your form to those who haven’t yet responded. Under the Response tab, you can see a summary of all responses, or drill down into individual responses.

4) Receive Notifications and Status Updates


request response notification

Once you’ve created a form, it is easy to get distracted while you wait for answers to accumulate. Now you can request notification emails to be sent your way each time a participant completes your form. Hello, automation!