Thursday, October 29, 2015

10 Google Apps tips EVERY teacher should know from Ditch That Textbook

Google Apps has its own unique quirks that can make life more efficient. Here are 10 tips EVERY teacher should know. (Flickr / Chris Schrier)
Most of us have worked for years with Microsoft Office before Google Apps was unveiled. That means we’re pretty familiar with some basic tips that have become staples in our lives, like:
  • Ctrl+C = Copy
  • Ctrl+V = Paste
  • Ctrl+Z = Undo
  • Hold in Ctrl and use the arrow keys to jump from word to word or paragraph to paragraph
  • Hold in Shift and use the arrow keys to highlight text
(If you didn’t know those already, you may have just gotten your best takeaway points from this blog post in the second paragraph!)
Since Google Apps has come on the scene and taken the education world by storm, there are some quirks … no, eccentricities … no, subtleties … yes, subtleties! that come with the territory.
If you know them, you’re probably more efficient and quicker than you were before them. If you don’t know them, well, your mind might be blown just a little bit after reading this post.
Here are 10 great Google Apps tips that EVERY teacher should know. (Note: Throughout this post, Ctrl can be substituted with Command on Mac computers.)
1. The power of searching – Need to fish a file out of your Google Drive? Searching can be so much faster than clicking through folders. I timed myself once. It took me 15 seconds to find a file in my complex folder system and only 6 seconds by using the search bar at the top of my Drive. I’ve largely quit filing files in folders in Google Drive for this reason. (Certainly it’s not laziness, right???)
2. Save that tab – Ever closed a tab and thought (or said out loud) (or screamed!), “Oh no, why did I close that? Noooo!” If Google Chrome or Firefox is your web browser of choice, it can save your bacon. Simply press Ctrl+Shift+T (undo close tab) and it appears out of thin air. It even saves your browsing history, meaning you can still hit the “back” key to go back.
3. Revision history – It happens to the best of us. A student types something inappropriate on a shared document. Or we wipe out large parts of a very important slide presentation. Never fear … revision history is here! Find it under the File menu (or contort your fingers to use the Ctrl+Alt+Shift+G hotkey). It will show you who made changes throughout the life of the file and let you restore a previous version.
Google Apps isn't just Docs, Slides and Sheets! Find more apps by clicking "More" at the bottom of the "New" menu. Add more apps by clicking "Connect more apps". Here's what my apps menu looks like.
Google Apps isn’t just Docs, Slides and Sheets! Find more apps by clicking “More” at the bottom of the “New” menu. Add more apps by clicking “Connect more apps”. Here’s what my apps menu looks like.
4. More than Docs, Slides and Sheets – We often think Google Apps is synonymous with the basic elements of Microsoft Office — Docs for Word, Slides for PowerPoint, Sheets for Excel. Not so! Click the red “New” button and then click “More” at the bottom of the menu. You’ll see new apps, including Google Forms (for surveys), Google Drawings (a simple graphic design app) and Google MyMaps (for creating custom maps with pins). Add others with “Connect more apps” at the bottom.
5. Add-ons – In the same vein as the additional Google apps, add-ons let you unlock new functions within individual files. Once you have a document, slide presentation or spreadsheet open, click the “Add-ons” menu. You’ll be able to add plenty of add-ons (see some in this post about add-ons). They include Flubaroo, a popular one that auto-grades quizzes and tests created in Google Forms.
6. Modify your URLs – URLs (also called “links” or “web addresses,” among others) are a key part of sharing files in Google Apps. Often, they start with “docs.google.com” and end with the word “edit”. Here’s a pro tip — by changing that word “edit,” you can make the file load differently. Examples: If you change “edit” to …
  • “Copy” — It will force the person loading the file to make a copy of that file to his/her Google Drive.
  • “Preview” — It will show a non-editable version of the file (a read-only version).
Give it a try to see how it works, and then start using it as a weapon of mass awesomeness!
7. Handy animals – Ever notice those colorful icons that appear at the top of a Google file when others are using the file too? Those aren’t just decorations, and they aren’t ONLY there to show who’s also viewing the file. You can quickly jump to where anyone is editing the file to see what he/she is doing by clicking on his/her colored icon. This is nice when working with a large file.
8. Table of contents – Speaking of large files (documents, specifically), one way to make them more manageable is to organize them with a table of contents. This creates a clickable list of the sections of the file that lets you jump to any part of the file you desire. It’s really easy to create them! Just …
  1. Type in some sort of section header above the different sections of the document you want to create. (It can be as simple as “Section 1″, “Section 2″, etc.)
  2. Highlight those section headers and click the dropdown at the top that says “Normal text”. Choose “Heading 1″.
  3. Click “Insert > Table of contents”.
Once the table of contents is there, you can even modify the text in it so it looks exactly as you’d like.
9. Image search – Want to help students be good digital citizens while they create gorgeous Google Apps files for you? Of course you do! But standard Google Images searches often display copyrighted images that students don’t have permission to use. Thankfully, Google has integrated a more responsible search tool into its apps. Click the image button up above the file you’re working on (or click “Insert > Image …”). Then choose “Search” out of the tabs at the top. This search displays Creative Commons images that are labeled for commercial reuse with modification — the most permissive Creative Commons license. (Want to know what Creative Commons images are OR how to use them the right way? Check out this post.)
10. Voice typing – This is a newer feature that might just blow your mind. Go to “Tools > Voice typing …” and click on the microphone icon that appears. Google Apps uses the microphone in your device to type the words you speak. This is great if you’re a very verbal person and would prefer to talk instead of type. It’s also great for students who may struggle using a standard keyboard. I’ve used it and it’s pretty accurate!

Wednesday, October 28, 2015

12 ways to use Google Classroom’s newest features

From Ditch That Textbok:

Google has released some great new features for Classroom. But what can we do with them? Here are some ideas. (Sketch by Matt Miller)
In fall of 2014, Google released Classroom to anxiously awaiting teachers. In a year’s time, those teachers put Classroom to work, with students turning in more than 70 million assignments.
Google released a handful of useful updates to Classroom recently andsome others in the last few monthsthat let teachers and students do even more fantastic learning.
It’s nice to see these updates, but I’ve found it often leaves teachers wondering, “What can I do with those changes?”
Good question! Here are 12 ideas for the classroom that these changes have made possible. As you read these, I’d love it if you thought about ways you or other teachers are using Classroom. Post those ideas as a comment at the end of the article!
Prefer to see how to put these ideas into action? Check out the interactive YouTube videos I created to accompany this post. Click on the embedded video below or here to see a list of all 12 ideas. Then click on the one you want to watch to be taken directly to a short video (about 80 seconds).
1. Create exit tickets and bellringer activities. Want to do some quick assessment at the beginning or end of class? Classroom’s new question-driven discussions let you post a question where students can post replies to answer it. (Worried about students copying each other’s answers? You choose whether students can see each other’s replies.)
2. Host an out-of-class viewing party. Is there a TV show, a live performance, a play or some other event that’s noteworthy to your class? Let students interact by adding a question in your Classroom and letting them reply in real-time with their reflections and observations. Add a single “Post your ideas here!” question or add several different types of questions to elicit answers on different specific topics.
3. Find and post evidence. Students can make all the assertions they want, but if they can’t back them up with solid data, they’re less than useful. Give students free roam of the Internet to find sites with data that supports or refutes what you’re talking about in class. Add a question where they can post links to their findings in a reply. When finished, the class will have a body of Internet research that any of them can go back to.
4. Offer video reflections. Another great use of the new question-driven discussions feature is a private place to comment on videos. When you post a new question, add a YouTube video that students can watch (or a link to a video on another video-hosting site if YouTube is blocked). When students watch that video, they’ll have a dedicated place to take whole-class notes, post opinions or answer questions.
5. Create new assignments from templates. Do you find yourself posting the same kinds of assignments or announcements in Classroom? If so, the new “reuse assignment” feature can help. Create a template that models the kind of assignment, announcement or question that you commonly use. (Maybe create a brand new class called “Templates” as a place to house it.) Then, when you need it, use the “reuse assignment” feature, find that template and change it as necessary before posting it. Save time and effort!
6. Create an easy reminder with a couple clicks. If you’ve assigned an activity or posted an announcement a while back, it can get buried under other posts in your classroom feed. To bring it front and center to students’ attention, use the “bump post” feature to move it back to the top. For longer projects (several weeks or months or an entire semester), bump that assignment once every week or two to keep students aware of it.
7. Embed a class due-dates calendar in a class website. If you have a class website using Weebly (my favorite), Google Sites or something else, adding a due-dates calendar can be a nice feature. Using these instructions from Google Support, you can take the calendar that Google creates for your class and embed an interactive version of it directly on your site. (Note: The Google Classroom calendar integration had been promised soon but had not yet been released at the time of publication of this post.)
8. Post a quiz or test. Google Classroom has lacked options for assessment, but a new feature will allow teachers to add a Google Form to Classroom. Google Forms, Google’s survey tool, let teachers ask different types of questions and gather them in a spreadsheet. It’s a quick and easy way to gather student feedback or assess students’ progress. If the quiz/test data is from multiple-choice, true-false or matching questions, a great Google Sheets add-on called Flubaroo will grade that quiz/test and provide you a grading report with detailed results. See more about Flubaroo here. (Note: Google Forms integration also had been promised soon as of publication of this post but had not been activated yet.)
Over the summer, Google released several other new features that teachers may have missed. Here are some implementation ideas that go with those new features:
9. Host discussions and activities across multiple classes. With Classroom’s new co-teacher feature, multiple teachers can be teachers of record for a class within Classroom. Set up a shared class in Classroom for multiple classes and add all those classes’ teachers as teachers of record within Classroom. Then, those classes can interact together, bringing more students into class work and discussion — and hopefully better conversations and collaboration!
10. Create an all-school or all-grade-level forum. Imagine a class in Google Classroom where students could interact, share ideas and see postings relevant to them. Create a class for an entire grade level or — if you teach in a small school like I have — an entire school. Set as many teachers and administrators as you’d like as moderators. Ask students questions and leave replies as viewable if you want interaction or not viewable if you want them private. This all-school or all-grade-level class can be a useful hub for student activity!
11. Use a photo to create an assignment. The cameras on smartphones and tablets make taking a quick picture a snap. Take a picture of the whiteboard/chalkboard after a good class discussion and pose a question or make an assignment based on it. Take a picture of something relevant to class and start a conversation about it. Pictures are powerful and connect to our brain differently than words. Harness that power!
12. Use the class photo as a bulletin board. The ability to change the class header photo in Google Classroom is not that new. But this may be a new way to use it! Use a tool like Google Drawings to create an image the size of your class header photo. Type reminders and important information on it. Save it as an image file (probably a JPEG or PNG … try 1500 x 400 pixels under File > Page setup > Custom …) and upload it as your class header photo. It will provide timely reminders to students whenever they access Google Classroom. Change it regularly to keep information updated and interest high!

Tuesday, October 27, 2015

Spotlight on Strategies: The Question Is…

spotlight-on-strategies

Even though there is always a mind-boggling amount of invaluable info shared on the Discovery Educator Network (DEN), one of the best resources available is the Spotlight on Strategies (S.O.S) series, a must-see DEN favorite designed to provide teachers with simple yet effective instructional practices for using digital content to support student learning.
To date, there are 70+ teacher tried and tested strategies featured on the DEN blog, and with permission from Discovery Education, I am now featuring some of these techniques on my space.
So, enough of that. Let’s fast forward to the really good stuff…
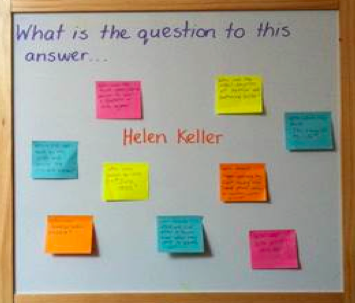
This week’s spotlight—The Question Is…—is a formative assessment strategy that can be utilized to guide instruction, intervention planning and delivery. 
Background
Formative assessment can help teachers better understand what students have learned as they progress through a unit of study. As a result, it’s important to find creative, effective and efficient ways to incorporate ongoing formative assessment. This strategy is easy to implement, requires no preparation, and uses materials commonly found in most classrooms. Yep, all you need is the answer to a pre-determined question and some sticky notes for student use. And best of all? It works in any classroom, with any age group!
The Question Is… technique is also a good springboard for classroom discussion, if students are asked to justify the questions they are posting, and obviously, it affords students an opportunity to practice formulating questions as well.
Now that I have your attention, all you have to do is click here to snag a PDF version of this super cool strategy which includes info related to materials needed and step-by-step instructions for utilizing the The Question Is… strategy in the classroom.
There’s even a video overview you can check out here. Pretty cool, eh?
And last, but certainly not least, here’s a visual to get those wheels turning…
the question is example
Better yet—click here to check out the entire S.O.S. series on the DEN blog!
So, there you have it: Another S.O.S. trick to add to your edtech toolbox. Stay tuned for additional ways to activate learning in your classroom…
Like what you see? Then take the digital integration challenge by trying to implement the Half the Story strategy and/or one of these additional ideas into a classroom lesson:
» Reading Between the Lines
» ABC Summary
» 6-Word Stories
» What Did They Say?
» A-E-I-O-U
» Snowball Fight
» Whittle It Down
» Concept Circles
» The Envelope Please
» Get Venn-y with It!
» MVP
» Partner Time
» Half the Story
From EduTech for Teachers

New Ways to Use Kahoot!


Click Here:  New Ways to Play Kahoot!

Kahoot! is just for Formative Assessment…. Or is it??

Like millions of other teachers around the world, Steph was used to using Kahoot! for the more obvious ways to play, like formative assessment and review. Her students loved it, and she’d already seen remarkable engagement in the classroom as a result. But she, like any great teacher, was all too aware that Kahoot! isn’t a quick replacement for smart lesson planning. As a sharp academic she really saw the importance of how you plan, create and host your kahoots needing to fit with the students’ learning objectives, and not just be about engagement and testing knowledge.

The A-HA! Moment

Looking at Kahoot! in that light, she wondered what would happen if she instead created a kahoot about something her students had never seen before. Playing the kahoot “blind” – in other words, with zero exposure to the topic beforehand - could level the playing field and spark the curiosity of her students.
And as far as teaching while the kids are in “questioning” mode… well, besides being way more fun, you just know that new knowledge is going to stick.
A total “a-ha” moment, Steph thought Kahoot! might offer a unique opportunity. So off she went to host her first Blind Kahoot – a quiz about oxidation states for students who had never so much as seen that material before.

The result?

Well, you should have seen Steph’s face light up as she talked about Blind Kahoot!’ing with her class!
With a clever 20-question kahoot, her students learned a new subject inside and out, from scratch. They worked together, debated, discussed, and felt empowered. And was that some real fun along the way, too? Check!
And what’s more, her simple little experiment took Kahoot! from being a fun formative assessment tool to a teaching tool integral to her curriculum. One which benefitted every single one of her students – regardless of ability or prior knowledge.
Later this week, we'll take a closer look at how she did it… and how she continues to do it today!

More ways to play!

We love how every single one of the Kahoot!'ers we meet has their own unique way of creating and playing learning games. We've done a quick round-up of just some of our favorite ways to play Kahoot! including Learners to Leaders, Global Classroom and those awesome brain breaks - check 'em out!

Monday, October 26, 2015

Just Sayin'


Student Creations and Presentations with Technology

7th Grade students have been working on projects covering the four ancient river valley civilizations from the eastern hemisphere.  Students have created projects to present using Smore, ToonDoo, Google Slides, Prezi, and Animoto just to name a few.  All student projects have or will be loaded onto Livebinders for presentation day.  Click the link below to check out some of their work!

Student Projects on Livebinders
Ancient River Valley Civilizations

Thursday, October 22, 2015

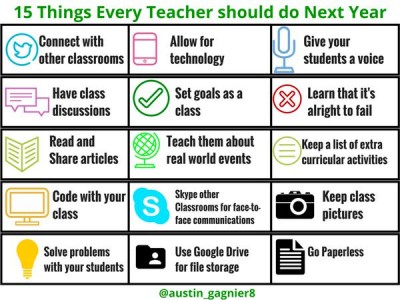
15 Things Every Teacher Should Try This Year Infographic

From EduTech for Teachers:

October5
Now that you’ve had a chance to settle back into another year, it might be time for you to take the (unofficial) tech challenge. Yep, just check out the infographic shown below to read about a few really swell ways you and your colleagues can shake things up in your classroom(s) for the remainder of the school year. No matter how big or small your students may be, here are some excellent edtech ideas that can promote 21st Century change in any learning environment.

Wednesday, October 21, 2015

Google For Education: Back To School Tips and Tricks


Teacher's Tools
youtube icon
SciShow-
 SciShow is a YouTube channel that discusses science news, history and concepts. With equal parts skepticism and enthusiasm, they go a little deeper on popular science topics.
youtube iconCrashCourse- CrashCourse provides educational videos aimed at secondary students. Playlists for past courses include Astronomy. World History, Biology, Literature, Ecology, Chemistry, Psychology and US History.
classroom icon
Every student on the same page-
 Save class time navigating to websites with the new Share to Classroom extension. “Push” a web link to your class and voila, the Chrome extension opens the page immediately on every student’s device.
the connectory
Get Connected-
 Find great STEM learning opportunities for students at The Connectory. Browse programs and resources by age and type to find just the right fit.
cs first iconComputer Science & Google, all together- Now you can see Google’s tools and programs for computer science education all in one place. Browse the new CS website to find the latest Google resources and programs.
mic iconLet your voice do the heavy lifting- Google Docs gets an upgrade with voice typing, a new feature that lets you or your students dictate everything from a new assignment to the rough draft for their latest English essay.
research icon
Research tool in Docs for Android-
 Writing papers just got a lot more convenient with the Research tool that allows you to search Google without even leaving the Google Docs Android app.
forms logo
Forms have a new look-
 Easily insert images, GIFs, or videos, and choose from some of the great new themes. See all the new updates to Google Forms.
sheets logoEasy charts & insights- Explore in sheets helps you spend less time deciphering your data and more time sharing insights. Explore automatically creates charts and visualizes trends right within your spreadsheet.

Monday, October 19, 2015

Tech It Up Tuesday: The LIFE Photo Archive & Document Analysis Worksheets

From EduTech for Teachers


Are you ready for another round of Tech It Up Tuesday, a series devoted to sharing an edtech tool, app, site or other resource that can be utilized in the classroom setting? This week’s shout out goes to theLIFE Photo Archive powered by Google, a collection of unpublished historical images from LIFE Magazine that span from the 1750’s to present-day.

This database containing millions of images—a joint venture between LIFE Magazine and Google—is completely free and very simple to use. Just access the site and then select a category of photos to browse (decades, people, places, events, etc.) or use the search option to locate the desired image. Once a photo is found, it can be downloaded to your device and utilized in multimedia projects, documents, presentations, etc.—so long as it has an educational/non-commercial use.

Here’s an example of one of the really cool never seen before images I found after conducting a search using the key words John F. Kennedy.


If you would just prefer to use the Google Images search engine to locate photos from the LIFE Photo Archive, then you can bypass the actual site by simply adding “source:life” to any search. The result? Only images located within the LIFE Photo Archive will be returned. (i.e. John F. Kennedy source:life). Give this advance search option a test drive!

Classroom Connection:

The LIFE Photo Archive is a great place to snag images that can be used for a variety of purposes: To introduce a historical topic and/or to spark a conversation about an event in history. These photos (or any photo as well as other media types) could also be utilized in conjunction with document analysis worksheets. Besides strengthening visual literacy, this concept is a great tool for use as bell ringers, pair share activities and exit tickets—all of which help to ensure that students are actively engaged with lesson content.

Examples of Document Analysis Worksheets:
Written Document (PDF) (HTML version)
Photograph (PDF) (HTML version)
Cartoon (PDF) (HTML version)
Poster (PDF) (HTML version)
Map (PDF) (HTML version)
Artifact (PDF) (HTML version)
Motion Picture (PDF) (HTML version)
Sound Recording (PDF) (HTML version)

The document analysis worksheets listed above were designed and developed by the Education Staff of the National Archives and Records Administration. You may find these resources to be valuable classroom tools as the use of images combined with instructional strategies and/or technology can…
Spark interest and enthusiasm
Engage the learner
Provoke thought
Provide clarity
Encourage interaction
Stimulate discussion
Make connections to learning
Address the four lenses of learning (meaning-centered, language-based, human, social)
Enhance critical thinking skills
Inspire creativity
Strengthen literacy, including information and visual
Promote a variety of 21st Century skills

And the best part: Lessons, activities and projects using images can be designed and utilized in all content areas across the K-12 curriculum!

Try EDpuzzle's Chrome Extension to Save Videos for Flipped Lessons

from Free Technology for Teachers

EDpuzzle is a neat tool allows you to add your voice and questions to educational videos. Recently, thanks to David Kapuler, I learned that EDpuzzle offers a Chrome extension. EDpuzzle's Chrome extension enables you to save YouTube videos directly to your EDpuzzle account. This means that instead of having to search within EDpuzzle for videos you can simply browse YouTube like you normally do then just click the EDpuzzle extension to save the video. Once a video is saved you build your questions around it.

For those who haven't tried EDpuzzle, it is a nice tool for building flipped video lessons. You can insert into saved videos your own voice comments and text comments. You can also create a series of questions to go along with your chosen video. Questions are inserted along a timeline that matches the video. That means that your students don't have to wait until the end of a video in order to answer the questions you've created.

Applications for Education
EDpuzzle can be a good tool to use to create short review videos or flipped lessons for your students. You can also have students use EdPuzzle to annotate videos by pointing out important aspects of videos by using the voice comments option and or the question building option.

Friday, October 16, 2015

20 ideas for solid student blogging from Ditch That Textbook

Student blogging

My students love to tweet. They share photos on Instagram. They know all the cool viral videos on YouTube.
They are expert digital collaborators, connecting with others to discuss topics near and dear to their hearts.
That’s why I had them start blogging this year. Theirs is an online world, and I want them to be there when they engage with my content.
It’s a work in progress, and I’ll do it much differently next year than I did in this inaugural year. But I like the connections they make with each other when they blog and do it well.
After a year of experience and absorption of as many student blogging articles/chat comments/podcasts as possible, here are 20 things to consider:
1. Write about class and more: Connections to and opinions about class content are great, especially if students discuss via comments. But we’re missing a great opportunity if we limit it to that. Kids don’t automatically reflect on their lives and what’s important to them. Their blog in your class may be their only opportunity.
2. Open topic posts are good: Richard Byrne of Free Tech for Teachers recently suggested that students reflect on what they’ve learned that week in a simple blog post. It could be open to all classes or just from your content area.
3. Go to their world: So what do they write about? Try to meet students in their world as much as possible. Making content touch their own lives is a connection that can last a lifetime. Pop culture, music, sports, etc. Listen to what they talk about in class. Example: How does one of their relationships mirror the relationship that two characters from your class have?
4. Let students pick: Open the floor for writing prompt suggestions. You might be surprised at the kinds of creative, relevant connections they make.
5. Teamwork works: Encourage students to connect with each other in their posts to make them more personal, and not just in the comments they leave. Q&A interviews and polls work well.
6. Do your homework: Encourage (or require) students to link facts in their posts to real-world sources. Hyperlink webpages. Cite hard-copy texts. Use direct quotes when citing a classmate’s opinion.
7. Encourage readability: Good blog writing crosses over from the “real world” to the classroom. Catchy introductions. A “what’s it about” paragraph early on. Bullet points and lists. Short paragraphs. Simple sentences. Conclusions with questions.
8. Reward out-of-class blogging: I believe in making student blogs a place where students want to go at home and on the go. I’m interested in trying incentives for after-hours activity (i.e. extra points/privileges, polls/games for interest, etc.) Real-time blog responses to events (i.e. school activities, news, etc.) can do this.
9. It takes time: I’ve found that rushing students to write and comment leads to shallow content. A little time can encourage a great digital conversation.
10. Emphasize clean copy: Online writing doesn’t mean text-messaging writing conventions, and some students might miss that point if you don’t bring it up. Solid spelling, grammar and idea development gives them credibility in the eyes of their readers.
11. But don’t nitpick: Avoid the temptation to correct every spelling and grammar error. Real-life blog readers don’t do that (not much at least!). Plus, it discourages their creativity and initiative. If a spelling/grammar pattern emerges, consider addressing it privately.

[RELATED: 6 reasons why I’m starting a teacher blog — and why you should, too]

12. Good comments are key: Well-thought-out comments are online conversation jewels. Good ones add ideas/information to the discussion, insert personal experiences, provide insightful links/quotes, ask follow-up questions, etc.
13. Choose a stance on comments: I can see two schools of thought on comments: quantitative and qualitative. The quantitative stance has countable requirements (comments, words, etc.). It can assure participation but promotes an “I have to” mentality. The qualitative stance values quality of discussion over quantity but may result in less participation. A mix of both may be the best option.
14. Create respect: The lack of face-to-face communication in online discussions makes it easy to forget that real people actually read what we write. Students can become brazen with harsh comments if they don’t remember the peers they’re addressing. Civility should rule.
15. High-five good work: Find ways to promote quality blog posts and comments outside of the student blog. Mention them or post them in class. Add them to the class webpage. Include them in school newsletters. The sky is the limit.
16. Decide on privacy: Public student blogs can open children to the harshness and dangers of the real world, but they offer an authentic, global audience. Students thrive on outside-of-school comments. Link to student blog posts on Twitter with the #comments4kids hashtag to open them to a huge worldwide audience.
17. Find a medium: There are plenty of potential homes for your students’ blogs. Richard Byrne lists several in this post. They range from the basic (KidblogEdublogsBlogger) to the complex (self-hosted WordPress).
18. Break the economic barrier: Students without home Internet access are at a disadvantage. Help them find Internet time in school (study hall, library time, computer lab time, before/after school time) or out of school (at a library, a friend’s house, etc.). A phone call or e-mail to a parent could uncover the answer.
19. Cumulative products are good: Find an end-of-the-year product students can create using their blog posts. They could create a book (print or PDF ebook), derive a Weebly website, compile a top-10 list of posts or comments.
20. Reflection is good, too: When students look over their work for a year, they can see how they’ve grown as a writer, a learner and a person. They relearn important lessons. They combat the “I didn’t learn anything in that class” mindset.