A Blog to learn and share as we take this technology and learning journey!
Friday, December 9, 2016
Animate Maps for U.S. History
From Richard Byrne at Free Technology for Teachers:
Creating my earlier post about resources for learning about Pearl Harbor prompted me to revisit a couple of animated maps of U.S. History.
History Animated is a resource that I first started using with students in 2009. History Animated provides animations of battles of the American Revolution, the War of 1812, the US Civil War, and US Campaign in Europe in WWII, US Pacific Campaign in WWII. In each of the three series of animations you will see the animated movement of armies displayed on a map. Each animation is accompanied by captions describing the strategies of the armies as well as the results and consequences of each battle. The animations will make great supplements to classroom instruction. The animations are a significant improvement over drawing or pointing to places on a map.
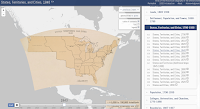
The Digital Scholarship Lab at the University of Richmond hosts the Atlas of the Historical Geography of the United States. This atlas contains more than 700 historical maps of the United States. The maps within the atlas are arranged into eighteen sections. Many of the maps within the Atlas of the Historical Geography of the United States can be animated to show changes over time. For example, in the section on States, Territories, and Cities you can view individual maps for each decade from 1790 to 1930 or you can click the "animate" button to see the maps put together in a time lapse animation. All of the historical maps in the Atlas of the Historical Geography of the United States are displayed on top of a contemporary outline of the United States.
Wednesday, December 7, 2016
15 YouTube videos all educators must see
Whenever I work with teachers, I always have a YouTube playlist handy. It has videos that always seem to resonate, entertain, educate or inspire.
I constantly find encouragement in videos that others share. And in a world where well produced, stunning videos can be created by virtually anyone, it’s easier to find than ever.
Here are the videos I have in my “Presentation videos” YouTube playlist. Some are thought-provoking. Some are entertaining and funny. Others may give you ideas for class, and others may inspire you.
And if you know of a video that didn’t make this list, please add it in a comment at the end of the post!
1. The Voice of the Active Learner – Education from a Digital Native’s Perspective —This is a go-to video for me. It’s the first-person account of a girl telling us what she’s looking for in her education. It’s a great reminder of the types of students that are in all of our classrooms.
2. Funny Toilet Paper Commercial — The term “paperless” is quite the buzzword in education these days. Going paperless can make us more efficient and create great learning experiences. But I think paper isn’t going anywhere anytime soon. You’ll see why in this video!
3. TeachingCenter — Ever wonder what it would be like if teachers were treated like professional athletes? What would a TV network devoted to education look like? Key and Peele (Comedy Central) give us a pretty good glimpse in this sketch.
4. Google Nose and Gmail Motion — OK, two videos here. If you haven’t seen Google’s April Fool’s Day spoofs, some of them are really funny. Google Nose tries to convince you that Google is archiving scents. Gmail Motion takes typing by gestures to a ridiculous level.
5. Skype Translator preview opens the classroom to the world — This video demonstrates an amazing feature of Skype: live translation of voice to text in another language. That means it could listen to someone in another country speaking Russian and translate it to English. Being a career Spanish teacher, I’ve tried it and, as of publication of this post, the translation accuracy is pretty rough. However, as speech to text improves with time, you know Skype will improve this function. Something to keep an eye on.
6. A Dog-Tastic Mystery Skype Adventure — If you haven’t been using Skype, Google Hangouts, FaceTime or other video call services in class, you’re missing out. This video shows a dual Mystery Skype/virtual field trip. If you aren’t familiar, it will open your eyes to possibilities of connecting with the world.
7. Girl’s first ski jump — This fourth-grade girl is about to her first ski jump — a K40 jump, where she’s six to eight feet off the ground at one point. It’s safe to say she’s nervous about it, but she overcomes her fears. This video speaks to educators and students about pushing past our fears.
8. 1994: “Today Show”: “What is the Internet, Anyway?” — Remember when the Internet wasn’t quite a thing yet? And we were still trying to figure out email and websites and all? This video takes us back to when these hosts struggled with new tech on air. (If you feel behind the curve with new technology, this will make you feel better!)
9. The Story of Blind Kahoot!’ing — Many teachers use Kahoot! (getkahoot.com) to review material with students. But some are starting to use it to introduce new material in an engaging way. That’s what blind Kahoot!’ing is all about.
10. “Unsung Hero” (Thai Life Insurance) — On some days, it’s easy to feel like you’re not making a difference. Or maybe that all of your efforts are for naught. This touching video reminds us how much of an impact our persistent acts of kindness and generosity have on the world.
11. Every Opportunity — The actions and words we use with children can affect them greatly. We have to be careful to make a positive effect instead of a negative one. This video reminds us how interactions with adults can make or break a child’s day.
12. Obvious to you. Amazing to others. — As educators, it’s easy to slip into this trap. We feel like we’re not doing anything different than anyone else. However, our perspectives, our ideas and our experiences can really help others — and let others know about the amazing work being done in schools. This reminds me that we must share our amazing work with others.
13. Try to do — From the description: “A story about a big squirrel and a baby squirrel.” You’ll see that the baby squirrel can’t make it over the wall. This is a great lesson about recruiting help and perseverance. Warning: You’ll find yourself cheering for the baby squirrel!
14. Iguana chased by snakes (BBC) — Never give up! This iguana was dead to rights, so to speak … but he kept fighting and running from those snakes. (There’s some inspirational value here … but it’s mostly just an amazing video!)
15. RSA Animate: Changing Education Paradigms — This may be one of my favorite YouTube videos for educators of all time. There’s so much to love. Sir Ken Robinson. A vision of what education can be. Sketching. If you haven’t seen this one, you must watch it!
Monday, December 5, 2016
Breakout Edu, Kindergarten Style
This fall several of our teachers participated in The Global Read Aloud, working with classrooms across the United States to read the same books and share our thoughts and ideas about them. One such partnership was with Ms. Cain, a librarian in North Dakota who is working with one of our kindergarten teachers, Ms. Thomsen. Our collaboration takes places mainly through Seesaw where we share pictures and thoughts on the books we have read during this project.
Ms. Cain suggested doing a BreakoutEDU activity that was created specifically around our Global Read Aloud author study. BreakoutEDU with kindergarten?! I had only done this with adults (and Ms. Thomsen had never even heard about it)! Luckily, I had recently purchased a kit which made this the perfect opportunity to dive right in with students.
While the instructions for We Are Readers were well done and thorough I still modified some to make the activity run smoother for our little learners. Following are the accommodations and lessons learned.
Planning
We decided to place the students in groups, and give each group a puzzle to focus on. Since this was their first experience with an activity like this we thought it would help the students focus more and make sure everyone was engaged and had a role to play.
One of the puzzles involved students reading a narrative about travel and determining which direction the traveler went. As students new to kindergarten there weren't many in early November that could master the paragraph so I made a recording and had an iPad available nearby with a QR code linking to the audio. I also created a mat with 4 arrows so that they could easily manipulate each arrow as the traveler moved instead of having to memorize 4 sets of directions in sequential order.
The word lock involved the students solving a puzzle and then guessing the word the puzzle represented. Again, to make this easier for our first time we decided to create a word list for the students to choose from. One note: the word list is in lowercase letters whereas the lock has all capital letters. This made it difficult for some of the students to read and will be something we will make sure we address the next time.
Take-Aways
We introduced the activity, each lock and the puzzle that accompanied it. We talked about working together, persevering and how we would guide them but not give them answers. In all, the students broke out in a matter of 25 minutes! The activity was highly engaging and successful. It was a wonderful way to wrap up our author series.
1
Friday, December 2, 2016
Add Text Lables to Drawings and Pictures in SeeSaw Portfolios
From Richard Byrne at Free Technology 4 Teachers
In the two years since its initial launch SeeSaw has become one of my most frequently recommended digital portfolio tools. The team at SeeSaw is continuously developing new features to make it a better tool for students and teachers. The latest enhancement to SeeSaw comes in the form of a new labeling option in the SeeSaw iPad app.
SeeSaw now lets you apply text labels to the pictures and drawings that you or your students add to digital portfolios. This is in addition to the existing feature for drawing on top of images that you add to your portfolio. Watch the video below to see how the new text labeling feature works. Then check out SeeSaw's list of ten ways to use the labels.
Currently, the text labeling option is only available in the iOS version of SeeSaw. The feature will be available in the Android and web apps soon.
Wednesday, November 30, 2016
Ideal 21st Century Classroom?
My ideal 21st century classroom. What’s yours?
Iknow. We’re already many years into the 21st Century. And I know there’s a chance that the term “21st Century” might rub you the wrong way.
But we’re here, and teaching and learning look very different. At least they have the potential to.
When I started teaching in 2004, there was one computer in the classroom: a slow desktop computer to take attendance and report grades.
No iPads. No Chromebooks. No flip cams. No iPods. No 1:1 technology initiatives or augmented reality or virtual reality.
I was tickled when a retiring teacher gave me an LCD projector. (He said he couldn’t use it: “I don’t want to copy all my overhead transparencies over to PowerPoint.”)
I cobbled together what I called my “multimedia cart” — the projector, a CD/DVD player, a VCR and some speakers.
Oh, how times have changed.
Even if we don’t have an official “one device for every student” classroom or school, many students come to class with powerful supercomputers in their pockets every day.
We connect and share with our school community through social media, email and text message. (Remember when we thought the separation between school and Facebook should be like church and state?)
Now that we’re here in the 21st Century, what should our classrooms look like?
A teacher named Marie emailed me recently. Her school asked her to describe the perfect 21st Century classroom, and she wanted my thoughts.
I was really glad she asked. It gave me a chance to take a big-picture view at what’s possible.
So I responded, and I wanted to share my response with you. This was my response on that particular day, and it may change from day to day, month to month or year to year.
What I really hope this will become is a conversation. When you’re done reading, would you add your thoughts in a comment? Tell us any of the following …
- What your ideal 21st Century classroom would look like
- How it might look different than what I described
- What you agree with in this post
- What parts of a modern classes should look different (or the same!) compared to older, traditional classes
Here was my response to Marie …
Wow … the perfect 21st Century classroom. That’s a very big question. It could look different in so many ways. I think an important aspect is to know what the goals of the teacher/school/district are before crafting that classroom.I think there are some aspects that I’d make sure to include no matter what.One is to break down the four walls of the classroom with global connections.That could be with video calls (Skype, Google Hangouts, FaceTime) or other collaborative tools (Google Apps, etc.). Connect students with other classes around the country and world. Bring guest speakers in virtually. Take students on virtual field trips. These options are almost always free and open students up to the world around them in ways we can’t alone in the classroom.(Resource: SkypeInTheClassroom.com, DitchThatTextbook.com/connect)A second is to promote a student-centered classroom. Direct less from the front of the room. Give students options in activities, in topics of study, in projects to create. Direct them to YouTube and other videos — and let them find their own pertinent sources of content.A third is to promote creation instead of consumption. Creating and using creativity will become more and more important in the future workforce, and if we can encourage students to create and produce instead of only consuming and watching/listening/reading, they’re well positioned.(Resource: Project-based learning, any activities where students create instead of consume).A fourth is to encourage serving others. We have populations in our own communities and worldwide that we can serve in pursuit of our standards and learning. When students have a purpose larger than themselves, it elevates activities in the classroom to a higher level of motivation.Finally, always try to bring it back to the four C’s: critical thinking, communication, collaboration and creativity. These are the skills that we believe employers will really covet in new employees in the future. If we want students to be prepared to exhibit them, they need lots of practice in schools. (Note: I added this one after emailing Marie.)
Tuesday, November 8, 2016
Tools for Creating Screencast Videos
From Richard Byrne at Free Technology 4 Teachers:
Creating a screencast video can be a great way to show your students and or colleagues how to do things on their computers, phones, and or tablets. Screencasting can also be a quick way to create a short, flipped video lesson. At least a couple of times a week I'm asked about the tools that I use to create the screencasts that I share with teachers. Here's a run-down of the three tools that I use more than any others for creating screencast videos.
Screencast-o-matic:
I use Screencast-o-matic to record on both Windows and Mac computers. There is a free browser-based version of Screencast-o-matic and a paid desktop version ($15/year). The free version is great for most situations. The desktop version offers some editing tools and longer recording times. Both versions include a highlighted circle that follows my cursor around the screen to help viewers see exactly where I am clicking and writing on the screen.
Nimbus Screenshot:
Nimbus Screenshot is a free extension that allows you to capture screen images and create screencast videos. I use Nimbus screenshot when I want to create a screencast video on my Chromebook. Screencasts recorded with Nimbus Screenshot can be saved to your local drive or to an online Nimbus account. I chose to save to my local drive then upload to my YouTube channel. You could also save to your local drive then share to Google Drive or another online storage service.
AZ Screen Recorder:
AZ Screen Recorder is a fantastic free app for creating screencasts on your Android phone or tablet. Unlike a lot of Android screencasting apps AZ Screen Recorder does not require you to have root access to your device nor does it require you to mirror to another device to record. To create a screencast with AZ Screen Recorder on your Android device simply install it then open it and tap the record icon. You will see a three second countdown timer appear on your screen and then you’ll be recording. You can talk over your recording to explain what you’re showing on your screen. When you’re done just tap the stop button and your recording is saved on your device. You can share your recording directly to Google Drive, YouTube, or any other file storage service that is connected to your Android device.
Other tools & methods for creating screencasts:These are tools that I've used at various times for creating screencasts, but I don't use them on a regular basis.
There is no shortage of iPad apps that will let you create whiteboard videos in which you draw and talk. But recording yourself demonstrating how to use an app or how to complete a workflow process on an iPad requires something outside of a stand-alone app. If you have a Mac, connect your iPad to your Mac by using the Lightning cable (the cable that came with your iPad). Then open QuickTime on your Mac. Next select "new movie recording" from the QuickTime menu. You can then choose the name of your iPad and click record. When you're done recording your new screencast will save to your computer as a video file that you can then edit in iMovie if you want to cut out portions of it or lay a music track under your narration.
If you have a Windows computer and you want to record your iPad's screen, you will need a third-party service that allows you to mirror your iPad to the screen of your Windows computer. Air Server is the service that I recommend for mirroring an iPad to a Windows computer. Air Server includes a recording tool that you can use to make a screencast video of your iPad's screen. With Air Server running you can just tap record and instantly start capturing your screen and your narration. The video will save on your Windows computer where you can then edit it and or upload it to your favorite video hosting service.
The simplest way to create a screencast on a Mac is to use Quicktime. Apple offers step-by-step directions for recording a screencast through Quicktime. The shortcoming of making a screencast this way is that it lacks a highlighter for the cursor on your screen.
Tuesday, November 1, 2016
Richard Byrne's Practical Ed Tech Tip of the Week
Practical Ed Tech Tip of the Week – 5 Ways Students Can Find Free Images
5 WAYS STUDENTS CAN FIND FREE IMAGES
When students are searching for images to use in their slide presentations, videos, or other multimedia projects it can be tempting to them to simply perform a Google search then right-click and save the first images that they like. Of course, in doing that they could be downloading copyrighted images that they shouldn’t be using without permission. Instead they should be consulting sources for images that are either in the public domain or that have been labeled for re-use with a Creative Commons license. In the following video I provide an overview of five sources of public domain and Creative Commons licensed images.
Wednesday, October 26, 2016
Lesson Ideas from the National Archives
From Richard Byrne at Free Technology 4 Teachers:
you of the National Archives Today's Document feed. On a daily basis Today's Document features
a new image or document from the United States' National archives. The documents are usually
accompanied by some additional research links and lesson plan resources.
One of the documents that I have used from the Today's Document feed was a
petition to the US Government signed by Hopi (Moqui) Chiefs. One of the interesting things about
this document is the way that the document was signed with the symbol of each family in the tribe.
Applications for Education
This document could be used with a wide range of grade levels. At the middle school or high school
Applications for Education
This document could be used with a wide range of grade levels. At the middle school or high school
level the petition could be part of a lesson on the way the US Government redistributed land to Native
Americans following the Dawes Act. The symbol-signature aspect of the document could be used in an
elementary school lesson about cultural differences between European-Americans and Native Americans.
Tuesday, October 25, 2016
Google Add-Ons and Extensions
Here is a Googly Game board filled with live, clickable examples of Google extensions:
Extending Google Tools
For those of you (us) still using Google, I hope you find something useful!
Original Source: A Tweet from Heather Marshall
Extending Google Tools
For those of you (us) still using Google, I hope you find something useful!
Original Source: A Tweet from Heather Marshall
Monday, October 24, 2016
WriteReader-Collaborative Book Creation for Elementary Classrooms
From Richard Byrne at Free Technology 4 Teachers:
WriteReader is a neat multimedia writing platform for elementary school teachers and students. The appeal of WriteReader is found in the collaboration between students and teachers. Students can create multimedia books that teachers log into to correct. As is seen the video below, each page of a book has a space for students to write in and a space for teachers to write in. Teachers use the space on the page to correct spelling errors and or make editing suggestions.
WriteReader books can include text, pictures, and voice recordings. Completed WriteReader books can be shared online and can be downloaded as PDFs to print.
Applications for Education
WriteReader's teacher edition lets you create online classrooms. You can manually create accounts for your students or you can have your students join your classroom by entering a class code. Either way, your students don't need to have email addresses to use the service.
Creating picture books in WriteReader could be a good way for students to develop their writing skills. You could insert an image into the pages of a book and then have students write a short description of what they see. The audio commentary option could be used by students to describe what they are seeing and trying to write.
Thursday, October 20, 2016
Appy Hour: Social Studies
Appy Hour will provide you with a fast-paced introductory approach to FREE apps that are appropriate for secondary students. App-teasers for Social Studies/History will be sampled. After this post you will think beyond the concept of an App as simply being a game – you will leave with a menu of appealing concrete lesson ideas you can serve as soon as you are back with your students! An iPad with all required apps will be included for use during the duration of the class.
©2011. Lisa Johnson. All rights reserved. Permission to reproduce for classroom use granted
Jog iTunes with Me
Thursday, October 13, 2016
Appy Hour: ELA
Appy Hour will provide you with a fast-paced introductory approach to FREE apps that are appropriate for secondary students. App-teasers for ELA will be sampled. After this post you will think beyond the concept of an App as simply being a game – you will leave with a menu of appealing concrete lesson ideas you can serve as soon as you are back with your students! An iPad with all required apps will be included for use during the duration of the class.
Jog iTunes with Me
iPad Lessons ©2011. Lisa Johnson. All rights reserved. Permission to reproduce for classroom use granted
Thursday, October 6, 2016
Appy Hour: Math
Appy Hour will provide you with a fast-paced introductory approach to FREE apps that are appropriate for secondary students. App-teasers for Math will be sampled. After this post you will think beyond the concept of an App as simply being a game – you will leave with a menu of appealing concrete lesson ideas you can serve as soon as you are back with your students! An iPad with all required apps will be included for use during the duration of the class.
Math Appy Hour (Jog the Web Tour)
Jog iTunes with Me
app_happy_math (Menu of Math Apps Sampled)
Sample Parent Handout
Check out More Apps for Math
Check Out Podcasts For Math
©2011. Lisa Johnson. All rights reserved. Permission to reproduce for classroom use granted
Subscribe to:
Posts (Atom)